Catastrophic Loss

What if you lost your entire astrophotography imaging history?
Introduction
Astrophotography is one of the most demanding hobbies in both time and data. A single night of imaging can produce tens of gigabytes of raw data — and over a year or more, that can quickly scale into terabytes. But unlike casual photography, these datasets are often impossible, and highly impractical to recreate. Imagine losing all of your data from dark skies trips, or one time astronomical events, not to mention your accumulation of object data over the years… gone!
This post is a behind-the-scenes look at how I archive and back up my full astrophotography library: from raw lights to final masters, and everything in between. I’ll show you my full system — drives, spreadsheets, scripts, and cloud backups — so you can build your own strategy, whether you’re just getting started or staring at a decade of scattered files. When completed, we will have a bulletproof system of data backup along with a catalog archive that is not only useful as an index of your object data but also great for looking at your imaging data in different ways to provide you with information and visualizations to help you better understand the data you’ve captured!
Part 1: Why Archive and Backup Matters
If you’ve been doing astrophotography for any length of time, you know: clear skies are rare, and time is precious. Every byte of cosmic data we capture holds value not just for us today, but for decades to come — potentially becoming part of a legacy that can be explored, reprocessed, and appreciated by future generations. Your data may one day inspire imagers, teach future learners, or even contribute to scientific discovery — a preserved signal from a fleeting night sky, echoing far beyond its moment of capture.
It could serve as training material for machine learning models, or provide critical context for documenting long-term changes in deep-sky objects. The point is: your data is valuable beyond measure. And this is the core reason why we archive and back it up.
Each dataset represents hours of setup, focus runs, filter swaps, and guiding tweaks — and that’s just the acquisition. Add in calibration, stacking, and post-processing, and you’re looking at a significant time investment. The idea of losing all of that because of a failed hard drive or accidental deletion? That could be devastating on multiple levels.
I’ve come close — one of my external drives started clicking right after I finished capturing a stunning set on SH2-132. Fortunately, my system had already backed it up twice. That moment solidified why I never treat storage as an afterthought.
In the sections below, I outline my archive and backup methodology and provide examples of how and why these strategies work for me. Everyone has different workflows and requirements, and I encourage you to adapt what you find here to suit your own needs. This guide is meant to serve as a proven foundation for data redundancy and effective practices — giving you the confidence to restore without loss, and gain new insight into your imaging archive.
Your data is your time. Protect it like your telescope.
Foundational Note: Network & I/O Considerations
When implementing a real-time backup workflow or organizing your archive, it’s worth evaluating the reliability of your infrastructure first. Transferring high volumes of FITS or RAW image data between systems places demands on both your network and USB bandwidth. Here are a few notes/tips that should be used to help you assess areas that may be brittle as related to your network and data transfer infrastructure.
Whenever possible, use wired Ethernet connections between your imaging device and your processing machine. Ethernet offers the speed, low latency, and stable delivery required for reliable real-time duplication. If Ethernet isn’t available, a secure and interference-free Wi-Fi network can suffice — but ensure devices are on the same subnet, and avoid congested or weak signal areas.
USB transfer speeds are another common bottleneck. Avoid chaining multiple high-speed drives through a single hub or shared USB controller, especially with your camera connection. Prioritize USB 3.1+, USB-C, or Thunderbolt connections when working with large file
volumes. Also be aware some laptops share internal USB lanes, which can throttle performance when writing and reading simultaneously.
Infrastructure isn’t glamorous, but it’s critical. Stable transfers and reliable throughput are what make real-time backups — and smooth restores — possible.
Part 2: Folder Structure and Naming Conventions
Let me be upfront — my directory and file structure isn’t perfect. It’s been evolving since the beginning, and like many astrophotographers, I didn’t take naming conventions or long-term organization seriously when I first started out. Back then, it was all about getting the gear to work and capturing photons. The result? I’ve had to go back and do some extra work to catalog older data and bring everything into a consistent structure. That’s the price of learning, and honestly, I don’t regret it — but I do want to help you skip some of the mess I had to clean up.
What follows is the system I use now: it’s scalable, consistent, and designed to save you time in both processing and recovery. Feel free to adapt it to your workflow — the key is that you pick something sustainable and stick to it.
There is a free download with this directory template, read on
Before you think about folder structures or cloud storage, let’s be clear: the first priority is always backing up what you have. Whether or not your files are perfectly named or neatly filed, you can’t organize what’s been lost. Once your data is protected, then comes the structure. Over time, I’ve developed a local storage strategy that supports fast access, long-term redundancy, and future-proof organization. It includes a mix of SSDs, external drives, and tiered naming conventions that help me know at a glance what each device is for.
Here is an example directory structure, one that I use for organizing my project. The file structure actually begins within my capture process, in my case from within NINA and image path pattern. Other capture software, such as SharpCap, EKOS, etc.. also allow you to define your image paths and this is a very powerful first step in achieving a convention that is repeatable and predictable. This can provide benefit not only through organization and simplification of searching through your files, but also for automations involving file copy, importing, etc… that can then be based on a consistent structure.
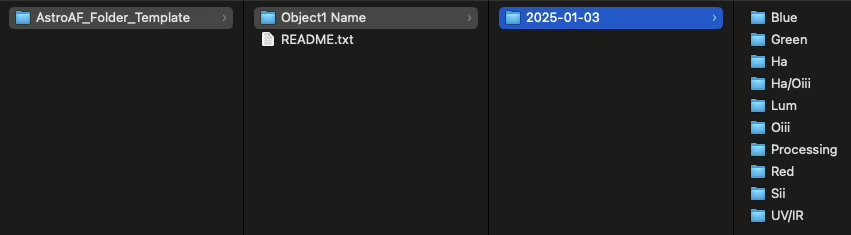
/AstroArchive/
├── M104/
├── ├── 2024/
│   ├──── M104_2024-01-04/
│   ├──── M104_2024-01-05/
│   ├── 2025/
│   ├──── M104_2025-05-29/
│   ├───v M104_2025-05-30/
In my NINA file pattern configuration (found in Options -> Imaging) I use the following pattern:
$$TARGETNAME$$\$$DATEMINUS12$$\$$FILTER$$\$$DATETIME$$_$$FILTER$$_Bin$$BINNING$$_$$SENSORTEMP$$c_$$EXPOSURETIME$$This give me the following directory path + filename format:
M33/2015-12-31/L/2016-01-01_12-00-00_L_Bin1x1_-15c_10.21I do the same for my calibration path patterns, here’s a screenshot of my pattern configuration:
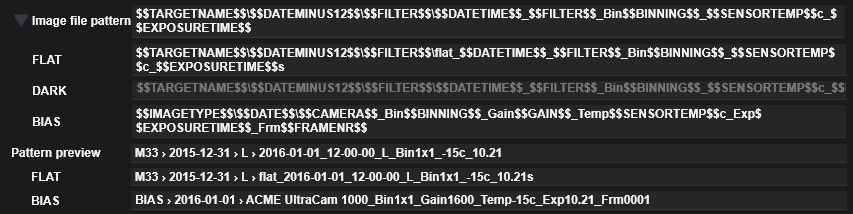
I tend to use an object > date > filter structure, with optional suffixes like _LRGB, _HaOiii, or _Mosaic when relevant. This makes sorting and searching predictable — especially when paired with a good spreadsheet index (more on that soon). Also note that my filenames use a datetime_filter_bin_temperature_exposure pattern. This serves as great metadata for both visual and automations and helps prevent the need for opening individual files to inspect their fits headers for the same information.
What I Save
- Final processed images
- Master Calibration files
- Master Stacked Files
- Blinked Raw Subs
What I Don’t Save
- Rejected subs
- Test frames, focus shots, or single-night throwaways
- Calibration subs
- Project files
- Temporary conversion, sequence, registration, and calibration files
Once I establish a repeatable and predictable structure and convention, it becomes much easier to automate some processes. For example, getting file data from a drive so that it can be exported to a CSV file for later import into a spreadsheet or database for cataloging and obtaining information about your data (see below). Your data can be used for object planning, understanding trends in your astrophotography, visualizing various metrics about your astrophotography, and many other data-centric capabilities you may wish to incorporate, such as AI training data for machine learning, astrophotography application and script development, and many other possibilities!
find /Volumes/AstroAF_ARCH01 -type d | while read -r dir; do \
  count=$(find "$dir" -maxdepth 1 -type f | wc -l); \
  echo "$dir",$count; \
done > ~/Desktop/archive_structure_with_counts.csv
There is a template script available for free download, read on
Part 3: Local Storage Strategy
Always Be Backing Up
The first stage of my backup strategy is to begin backing up data at the moment of capture. As images come in from the camera they are immediately copied from the telescope miniPC to my processing PC over my network. This is accomplished through an automated process I have configured in NINA, using the Remote Copy plugin and RoboCopy. I add RoboCopy as an instruction at the beginning of My Advanced Sequence (have a look at that article and even download my Advanced Session Template).
I also have a related video about Automating Everything! RoboCopy automatically starts monitoring my Astrophotography directory and syncing newly added files over my network as they come in. At the end of my session, I instruct RoboCopy to stop after 5 minutes to ensure that it has had time to complete copy for the last file(s) that were captured.
Once the files make. it to the processing computer on my network, they are immediately introduced further into my backup system where the images are saved temporarily to iCloud and also backed up to TimeMachine on an attached USB external drive. At this point I have the original on the MiniPC, the copy on my MacBook, a backup on iCloud, and another backup onto my external drive via TimeMachine. That gives me four total copies of each file before I even start processing — which means even if my entire setup vanished, I could restore that night’s session without data loss.
Fast Cache (Staging Drive)
My active working projects are staged on a fast external NVMe drive. Speed is critical for stacking and stretching data efficiently so I work with my projects locally on my MacBook astrophotography processing machine. I introduced a 1TB nVMe staging drive where I create backups of my work-in-progress. I continue to use the staging drive during my projects and save to it frequently. This drive will have the entirety of my in-progress project, including project files, calibration frames, temporary registration, local normalization, WCS files, master files, and all of my lights and processed finals. Here is a simple rsync command that I use to quickly update my staging drive with only changed and newly added files for a project:
rsync -avh --progress "/Users/douglas/Pictures/Astrophotography/_nightly_file_copy/m 104/" "/Volumes/AstroAF_staging/m 104/"You can setup your own, modifying your path to your project folder and staging drive.. You can even test what will happen without actually transferring any files by first using the –dry-run flag in the above command, for example:
rsync -avh --dry-run "/Users/.../" "/Volumes/..."Then, if you want to take it a step further, you can automate rsync to watch your project folder using fswatch. You can easily install it with Homebrew:
brew install fswatchThen you can modify the above command to automate with a folder watch using the following command:
fswatch -0 "/Users/douglas/Pictures/Astrophotography/_nightly_file_copy/m 104" | \
xargs -0 -n 1 -I {} rsync -avh "/Users/douglas/Pictures/Astrophotography/_nightly_file_copy/m 104/" "/Volumes/AstroAF_staging/m 104/"
This will:
- Watch for any change inside the folder
- Automatically trigger rsync when something changes
Of course, you can simply copy and paste from your local folder to your staging drive folder at any time as well. Using rsync makes it easy to just get changed or added files only, and automating it helps ensure you don’t forget to do it!
When you have completed your processing session you can then simply use Ctrl + C to stop the fswatch process (or just close the terminal window it is running in).
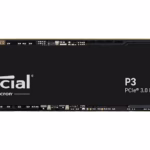
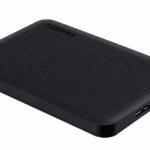
My Archiving Toolkit
These are the tools I rely on in my backup workflow.
I use affiliate links, but only for gear I personally trust.

Types Of Files On Staging:
Project files
Calibration masters
Registered subs
Local normalization data
WCS data
Master integrations
Processed finals
When I’ve reached the end of a project I begin optimizing the files on the staging drive. At this time I delete all of the calibration frames, temporary registration files, and project files. I’ve already blinked early on and discarded subs that were rejected. Since I have masters calibration files there is no need to keep the individual calibration subs. I keep a dark library for full length exposure darks as well as dark frames for flats that I use for dynamic brightness with fixed exposure darks to match my flats. The darks are used across multiple projects so I always have those to turn back to if needed. Thus, I seldom have a set of dark frame subs. I no longer use Biases, however, they would follow the same pattern as my full exposure darks with the use of a master bias. I ensure that I have masters for all of my calibrations and then I can clear out many Gigabytes of space right off the bat by discarding the calibration subs. Once my project is optimized for storage, I then transfer it to a larger long-term archive drive. When that transfer is complete, I remove it from my staging drive, delete it from my MacBook processing machine, and finally delete it from the MiniPC on the telescope.
Long-Term Archive Drives
When I first began archiving, I used year-based organization — but it quickly became a problem. Sessions for the same target, captured in different years, ended up on different drives. That fragmentation made revisiting or reprocessing targets inefficient so I switched to an object-based structure for my archives. All finalized projects now go to drives grouped alphabetically:
ARCH01– Targets A–MARCH02– Targets N–Z
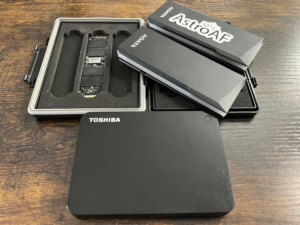
This lets me keep multi-year, multi-session data together in one place. I archive using external 2TB nVMe drives housed in tool-less enclosures — perfect for quick swaps and clean organization. When I’m traveling, I bring the extra archive drives with me in a protective travel case, so I can access data or maintain backups on the go. Drive swaps take 30 seconds or less. As storage fills, I have two paths forward: add more drives, or migrate to larger capacity ones. That flexibility has kept this system working smoothly without requiring major overhaul.
The key to any archive system is that it aligns with how you work, scales over time, and gives you confidence that no dataset is ever out of reach.
Compact Archive Kit
Part 4: Offsite, Cloud, and Redundancy
Once the data is captured, staged, and archived — the final layer of defense is redundancy. This is where I bring in offsite protection, multiple storage types, and automation to ensure that my imaging data is never vulnerable to a single point of failure. This is probably the most important concept of the overall strategy, never have a single point of failure that can result in lost data. This means that any storage which is in the same immediate location is at risk as a single point of failure (Think catastrophic event, fire, tornado, theft, etc…). This is where we need redundancy through offsite, cloud backup solutions. Here are the solutions I use for creating this redundancy offsite.
- Time Machine – Automatic local backup
- Backblaze – Offsite cloud redundancy
- iCloud – Temporary, stored as short-term protection
Time Machine
On my processing Mac, Time Machine runs constantly in the background, backing up to a dedicated external SSD. It captures all changes — including my active projects, temporary data, and system files — without requiring manual input. If my MacBook were to die mid-project, I could restore the entire system within hours.
This also provides a rolling history. If I accidentally delete or overwrite a file, I can roll back and recover it from earlier in the session. Additionally, it provides an extremely convenient way to upgrade my system and restore from my Time Machine backup, effectively setting up a new computer seamlessly from the old machine.
iCloud – Short-Term Protection in the Cloud
I also leverage iCloud Drive as a short-term safety net. While not designed for large datasets or permanent archival, it provides a convenient offsite backup in real time. This is especially helpful in the hours after a session finishes — while the data is still hot, iCloud gives me one more layer of coverage during the most vulnerable time: before it hits the long-term archive. I treat iCloud as temporary — but useful — protection.
Backblaze – Offsite Redundancy for the Entire System
For full offsite protection, I use Backblaze Personal to back up both my MacBook and my attached external drives. There is also a Backblaze Business with enahanced features for user and machine management. Backblaze runs continuously, uploads in the background, and can be restored via shipped drives or web download in case of emergency. Backblaze is my insurance policy against fire, theft, or catastrophic hardware failure. Everything in my system — from project folders to stacked integrations — is safe in an entirely different location. One of the great things about Backblaze is the egress process. When you need to get data retrieved from a cloud platform, downloading Terabytes of data can take weeks. On platforms like AWS S3 the cost of egress can be quite high, even though the monthly storage is quite inexpensive. Backblaze, however, offers a great solution. They allow you to purchase an 8TB USB drive for around $250 with all of your backed up data. They overnight this to you via FedEx so you can get your data much faster than downloading from the cloud. Then, they allow you to return the drive for a full refund when you are done with it, or, you have the option of keeping it and $250 is a great price for an 8TB USB external drive!
3 Copies, 2 Types Of Storage, 1 Offsite — The 3–2–1 Rule.
My strategy follows the proven 3–2–1 backup model:
- Keep 3 copies of every dataset stored on 2 different media types with 1 copy offsite.
- It’s a simple framework, but one that has saved my data more than once. Following this model gives me peace of mind every time I shut down after a long imaging session.
Your telescope may capture the light — but your backups protect the memory.
Part 5: Restore and Access Scenarios
A good archive isn’t just about disaster recovery — it’s about speed and confidence when you need to locate, reuse, or reprocess your data. Additionally, your archive drives represent an incredible resource of data and information that can be used in very significant ways. Whether I’m preparing a submission for my Image Gallery, rebuilding an older project with new calibration techniques, adding more data to older projects, or pulling up data for my annual retrospective, fast access matters.
Using a Spreadsheet Index
I maintain a simple but powerful spreadsheet index that includes:
- Target name
- Filters captured
- Session dates
- Exposure counts and integration time
- Archive location (e.g., ARCH01 or ARCH02)
- And more… (see screenshot)

With this, I can instantly locate a project and quickly determine the scope, camera, binning, and several other important datapoints that I can use as needed: From there, it’s as simple as mounting the appropriate drive, navigating to the folder, and pulling the data I need. I can re-stack, reprocess, or repurpose any dataset without digging through directories or hoping I named the folder correctly two years ago. I can determine what I need to continue capturing data on a target so that I setup in a similar way to my archived data, ensuring object capture is complementary to the data I have already acquired.
When Things Go Wrong
If a drive fails — which will eventually happen — I already have the following insurances:
- A working copy of my current project on my Mac
- A Time Machine snapshot
- An iCloud backup (temporary)
- The final archived version on my long-term drive set
- A copy of everything archived offsite on Backblaze
Recovery is a matter of restoring from the most recent tier available. In my worst-case scenario, a single restore request from Backblaze or a Time Machine volume swap puts me back in action with zero loss. This is the goal, the entire reason for putting in what is not a significant investment, the reason for putting in a few hours of work.
When things go wrong, they only get as bad as what you have not prepared for.
The Benefit of Confidence
There’s a huge psychological benefit to knowing your data is always recoverable. It frees you to experiment, stretch harder in post, or test new workflows without fearing you’ll “ruin” something. You can always roll back, start-overs are easy, you can experiment with different versions of your projects confidently, without fear of losing work. And then there is versioning, you can leverage Backblaze versions to restore to a previous version, it allows you to keep up to a year of active versions at any one time.
The more confident you are in your archives, the more freedom you have with your astrophotography.
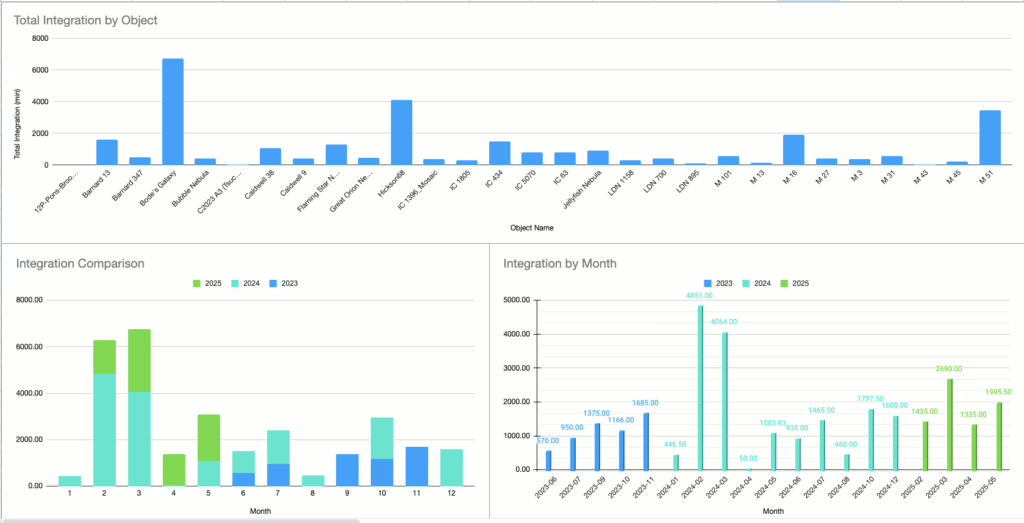
Part 6: Visualizing the Archive
A well-organized archive doesn’t just help you recover data — it helps you understand it. By keeping a clean spreadsheet index and a consistent folder structure, I’ve made it possible to visualize trends across seasons and years. These charts give me insight into where my imaging time is going, which targets dominate my archive, and how my integration time shifts throughout the year. As I maintain and add new session data, my visualizations update automatically — effectively creating a live astrophotography data dashboard. There’s a lot more I plan to do with this dashboard: analyzing targets by telescope, camera and filter usage over time, even correlating sky conditions with integration trends. But already, it provides a powerful lens into my archive.
This spreadsheet template is available for free download, read on
- Total integration by object
- Monthly integration by year
- Seasonal trends and growth
Insights I Track
Total Integration by Object
Shows which targets have received the most time — whether due to mosaics, multi-year efforts, or repeat attempts under better conditions.
Monthly Integration by Year
Reveals seasonal patterns and sky conditions. It’s helpful for planning future sessions or understanding the natural ebb and flow of imaging productivity.
Seasonal Growth and Activity Trends
Comparing years side-by-side (2023, 2024, 2025) highlights periods of progress — and helps identify months where weather, gear, or life prevented imaging. I use this to guide how I allocate time in the next season.
Why It Matters
This isn’t just for fun (though it is). It helps me:
- Plan which months need more imaging focus
- Spot underused filters or gear
- Create content for retrospectives or talks
- Understand how my archive — and imaging strategy — evolves over time
A strong archive doesn’t just protect your data. It reveals your journey.
Part 7: Final Thoughts & Strategy Summary
At this point, my backup and archive workflow is more than just a habit — it’s a core part of how I approach astrophotography. The effort I’ve put into organizing and protecting my data has paid off in confidence, efficiency, and long-term creative freedom.
Here’s the stack I rely on today, in addition to the drives on my MiniPC and Mac astrophotography processing machine:
- nVMe Working SSD – for fast, active project staging
- ARCH Drives – long-term, alphabetically organized and labeled
- Time Machine + iCloud + Backblaze – for automatic local + offsite redundancy
- Master Spreadsheet Index – for instant access and visual insights
Together, this system ensures my data is not just safe — it’s useful, accessible, and ready to be revisited or repurposed at any time. It didn’t all happen overnight. This system evolved over time, built one layer at a time as I learned what worked and what didn’t. If you’re just starting your archive journey — or revisiting it after years of disorganization, make sure the first thing you do is backup! — I hope this guide gives you a strong foundation to build on.
The light we capture is irreplaceable. Back it up like it matters — because it does.
When was the last time you reviewed your archive strategy? Let me know in the comments how you manage your astro data — or if you’re just getting started and have questions. If you’d find it helpful, I’m happy to share a downloadable starter pack that includes:
Thanks for reading! Clear skies and clean backups.
Cheers!
Doug
Leave a Reply