Introduction
6+ Months In The Making
I Lost Count Of How Many Revisions
I Learned Electronics To Design The PCB
I Taught Myself Fusion360 To Build The Housing
I Spent Countless Late Nights Coding, Testing, And Iterating
Two Months Of Real-World Field Testing.
FlatAF wasn’t just built—it was forged through obsessive problem solving, learning curves, and an astrophotographer’s refusal to compromise. What began as a side experiment to simplify flats in my back yard and on the road turned into a complete, portable, network-integrated calibration system. It works wherever you do, without the complexity or price tag of commercial options.
Disclaimer
FlatAF is a DIY (Do-It-Yourself) project intended for educational and personal use. AstroAF does not manufacture or sell FlatAF panels and provides no warranties, guarantees, or support for third-party builds or modifications.
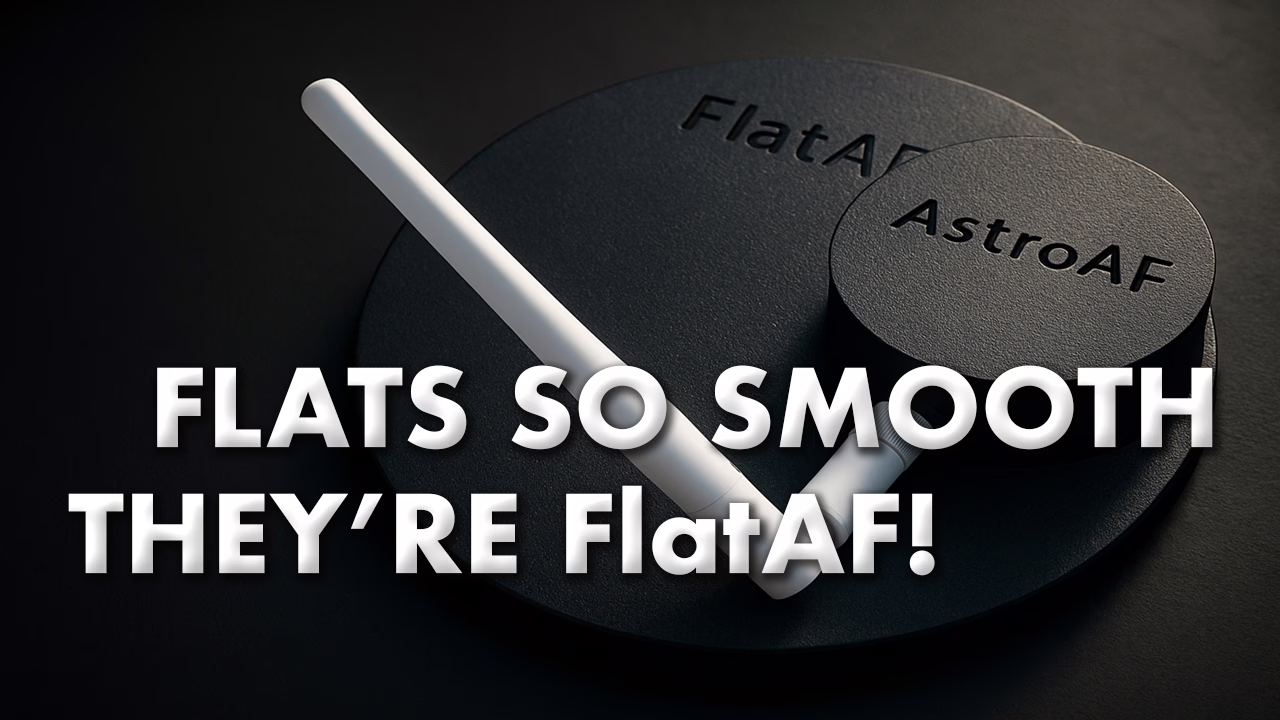
What Is FlatAF?
FlatAF is an open-source, Wi-Fi controlled flat panel system for astrophotography. It is designed to deliver reliable flat frame calibration in both backyard and mobile imaging setups. The device combines low-power LED illumination with real-time brightness control and full ASCOM Alpaca compatibility, enabling seamless automation through capture software like NINA.
Unlike commercial flat panels, FlatAF is battery-powered, network-aware, and completely DIY—from the PCB and firmware to the 3D-printed housing and open API. Whether you run a minimalist field rig or a semi-permanent setup at home, FlatAF offers an adaptable, lightweight solution that integrates directly into your calibration workflow with no cables to tether, and no guessing about brightness levels.
Why I Built It
The origin of this project was a persistent calibration issue in my narrowband imaging workflow.
Despite employing careful data acquisition and processing, I observed recurring artifacts in my integrations—particularly within the red end of the spectrum. These included visible banding, repetitive noise patterns, and characteristics that suggested the presence of etaloning. To address this, I initiated a methodical troubleshooting process.
I consulted with both the camera and filter manufacturers, experimented with stacking and calibration techniques, and reviewed technical documentation to understand the mechanisms behind etalon artifacts. Through this process, I identified the cause: my twilight sky flats were not only failing to correct these issues but were actively introducing them. The inconsistencies in spectral response, combined with uncontrolled illumination conditions, rendered the flats ineffective for precision calibration.
Special Thanks
I’d like to give a special shout out to Player One Astronomy and SVBONY for their incredible support in research and assistance in diagnosing the root cause of severe etaloning artifacts in my image train. Their insights helped guide the investigation that ultimately led to FlatAF solving the issue through the use of highly controlled, high-quality flat frames paired with matching dark flats. I’m grateful for their responsiveness and commitment to supporting the astrophotography community.
At that point, I began evaluating alternatives. Several commercial flat panels were available, but most lacked the specific feature set I required, particularly the ability to control brightness dynamically and operate wirelessly. Some existing DIY options offered partial solutions but often relied on tethered USB or Bluetooth connections, which did not align with my goal of a fully wireless experience. Additionally, these systems often lacked a robust and open software interface.
In response, I made the decision to build my own solution. I purchased a 3D printer to fabricate the enclosure and began learning electronics in order to design the supporting PCB circuitry. I also taught myself Fusion 360 to create a purpose-built housing that would integrate cleanly with my existing imaging setup. Over the following months, I developed and refined both the MicroPython firmware and a cross-platform ASCOM Alpaca driver, iteratively improving performance and functionality through hands-on field testing.
FlatAF is the result of that process, a Wi-Fi controlled, open-source, ASCOM-compatible dynamic flat panel. While it began as a personal solution to a specific imaging challenge, the project quickly evolved into an opportunity to expand my technical capabilities and contribute something meaningful to the astrophotography community.
How FlatAF Works
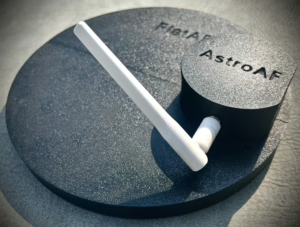
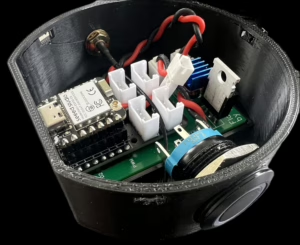
FlatAF is a compact, battery powered, Wi-Fi controlled flat panel designed for astrophotographers who need reliable and portable calibration tools in the field or at home. It supports full ASCOM Alpaca integration for automated capture software such as NINA, while also allowing manual control through a browser interface or via a single onboard button. The device is built for portability and resilience, featuring a light tight enclosure, low power consumption, and optional 3D printed mounting solutions. The entire project is fully open source and extensively documented for those who want to build, customize, or improve it.
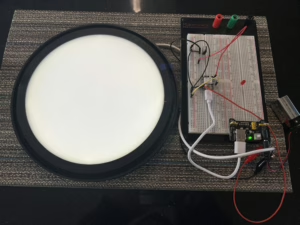
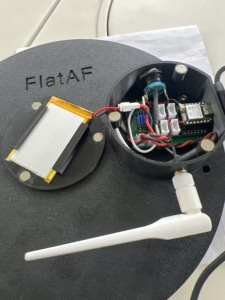
The system is composed of two main software components. The first is FlatAF_Alpaca, a cross-platform ASCOM Alpaca driver written in Python using the Alpyca framework. It runs on any system with Python 3.7 or later, including a MiniPC, Raspberry Pi, or the main capture computer, and communicates with your capture software over HTTP. The second is FlatAF_MicroPython, a firmware stack running on an ESP32 C6 microcontroller using MicroPython. It controls LED brightness and power through PWM and MOSFET circuitry, and it communicates with the driver across your Wi-Fi network.
Once both software components are installed and connected on the same local network, they use dynamic discovery to find each other automatically. No hard coding of IP addresses or manual pairing is required. For field use, FlatAF supports dynamic networks such as portable GL.iNet routers or even direct Wi-Fi access point mode when needed. It is designed to function smoothly in both mobile and fixed observatory environments.
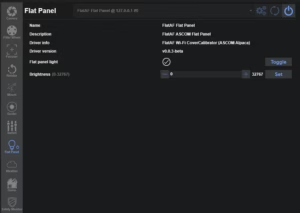
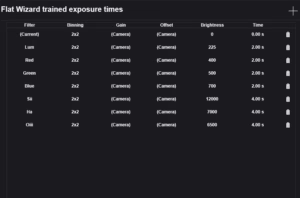
Control options are designed for both automation and convenience. In a typical setup, you will run automated flat sequences through NINA’s Flats Wizard. FlatAF dynamically adjusts panel brightness in real time, enabling consistent and fixed exposure calibration, which is especially helpful when matching with dark flats. However, the system is flexible and can just as easily be used for fixed brightness and variable exposure workflows, which is ideal for those who prefer to use bias frames. Manual control is equally accessible. A browser based interface allows brightness adjustments from any device on the same network, and the onboard button toggles the LED on or off with a short press.
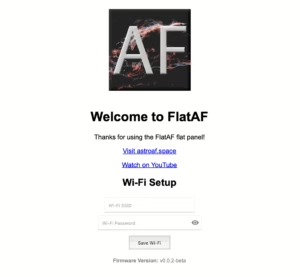
A five second long press enters Wi-Fi setup mode, flashing the LED to indicate that the device is in access point mode and ready for configuration. Simply enter your Wi-Fi SSID and Password and the credentials are stored onto the microcontroller allowing you to connect seamlessly. You can reset the credentials at any time by long-press of the onboard button, allowing you to easily switch networks whenever needed.
FlatAF is designed to be manually placed over the telescope objective and removed by hand. This intentional choice eliminates the need for motors or mechanical covers, allowing the design to remain lightweight, battery powered, and compact. As a result, FlatAF is particularly well suited for mobile imaging setups and semi permanent backyard observatories where flexibility and ease of use are essential.
The goal with FlatAF was to build a calibration panel that operates as seamlessly as commercial hardware while remaining open, customizable, and entirely DIY. By prioritizing practical performance and user friendly integration, the system supports both fully automated and manual workflows. Whether you want to automate a complete flats sequence or quickly trigger calibration from your phone, FlatAF adapts to your imaging style without adding friction.
Get the Code
FlatAF is a fully open-source project, released under a permissive license for personal and non-commercial use. Organizations interested in using the FlatAF software for commercial flat panel products are encouraged to Contact AstroAF to discuss licensing opportunities. Everything required to build, program, and deploy your own FlatAF system is available here and in the FlatAF GitHub Repository. This includes the full ASCOM Alpaca driver written in Python using the Alpyca framework, the MicroPython firmware for the ESP32-C6 microcontroller board, and setup instructions for both components.
The repository also contains detailed documentation to guide you through every step of the process. You will find PCB diagrams for connecting hardware components, guides for flashing the firmware onto the microcontroller, and instructions for deploying the Alpaca driver to your imaging computer. In addition, the repo includes preconfigured Postman collections for API testing. You will find links to download the design files in the section below.
You can explore or download/clone the code at the FlatAF Repository.
What You’ll Need to Build It
Building FlatAF is a rewarding DIY experience, but having the right tools and components on hand will make the process more efficient and enjoyable. This section outlines both the essential components (Bill of Materials) and optional tools that can help during prototyping, soldering, and final assembly.
Optional Tools and Assembly Aids
While not required, the following general-purpose electronics tools can significantly streamline the build process. Many hobbyists already own these tools, but if you are starting from scratch, affordable beginner kits are readily available online. The following items are affiliate links, if you would like to support this project at no additional cost to you, please consider using the following links. I will make a small commission for your purchase.
- A Multimeter is useful for checking voltage and continuity throughout your circuit.
- A Hot Glue Gun or Mounting Tape helps secure internal wiring and prevent movement inside the enclosure.
- Flush Cutters are ideal for trimming component leads and PCB stubs.
You’ll also benefit from a few specific tools that were used throughout the development and prototyping of FlatAF:
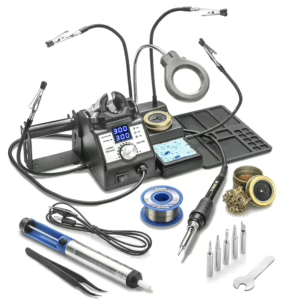
- X-Tronic 3060-PRO solder station
- SRA Rosin Paste Soldering Flux
- Solder Wick Braid
- Makeronics 1660 Solderless Breadboard
- Self-Adjusting Wire Stripper (3-in-1)
These tools are not exclusive to FlatAF and will serve you well across a wide variety of electronics projects.
Bill of Materials (BOM)
The table below lists all the core components used to build FlatAF, including links to purchase and estimated prices at the time of the original build. These are the exact parts used in the working prototype unless otherwise noted. The following part links are affiliate links. If you click through and make a purchase, I may earn a small commission at no extra cost to you. These earnings help support AstroAF and allow me to keep building open-source astrophotography tools like FlatAF. Thanks for your support!
| Component | Description | Link | Estimated Price |
|---|---|---|---|
| ESP32-C6 Dev Board | Main microcontroller with onboard USB-C and Wi-Fi | Buy on Amazon | $11.99 |
| Grove Base Shield | Connects pushbutton to ESP32 | Buy on Amazon | $9.89 |
| MOSFET Module | Controls LED brightness | Buy on Amazon | $0.99 |
| Voltage Booster | Boosts battery voltage to 5V | Buy on Amazon | $0.67 |
| 3.7V LiPo Battery | Rechargeable battery for wireless operation | Buy on Amazon | $10.99 |
| ST-PH 2.0 2-Pin Connector | Battery power interconnect | Buy on Amazon | $1.52 |
| JST XH 2.54mm Connector | Power connector for LED/MOSFET | Buy on Amazon | $1.26 |
| Momentary Pushbutton (LED) | Used for power/network control | Buy on Amazon | $10.99 |
| External Wi-Fi Antenna | 2.4GHz 2.81dBi antenna for ESP32 | Buy on Seeed Studio | $2.20 |
| Neodymium Magnets | Holds enclosure lid in place | Buy on Amazon | $0.99 |
| Diffuser Panels | Harvested from ceiling-mount LED panels | Buy on Amazon | $12.99 |
| White COB LED Strip | Mounted to back panel for flat frame illumination | Buy on Amazon | $7.99 |
| USB-C Cable | For power input and charging | Buy on Amazon | $12.99 |
| 220 ohm Resistor | LED current limiting for pushbutton | Buy on Amazon | $0.06 |
| PETG Filament | For 3D printing the enclosure | Buy on Amazon | $11.99 |
| Enclosure Screws or Fasteners | For mounting internal parts | — | $0.10 |
| Heat Shrink Tubing or Sleeves | Wire insulation and bundling | — | $0.10 |
| Heat Sinks or Thermal Pads (Optional) | For managing thermal output | — | $0.10 |
| FlatAF PCB | Ordered from JLCPCB via EasyEDA | — | $2.00 |
| Total Estimated Cost | $96.65 |
Note: Prices reflect actual purchase costs at the time of build. Some parts were purchased in multi-packs, and cost-per-unit has been adjusted accordingly. Prices may vary and do not include tax or shipping.
Networking and Control Recommendations
Although Windows can technically create a mobile hotspot, I do not recommend it for astrophotography applications. Windows hotspots suffer from several limitations that negatively impact wireless network devices such as FlatAF. Most notably, Windows assigns connected devices to an isolated subnet (typically 192.168.137.x), which prevents proper UDP broadcast and breaks dynamic discovery for ASCOM Alpaca devices. Additionally, hotspot behavior is often inconsistent following system sleep or reboot events, and there is no reliable method for assigning persistent IP addresses—complicating automation, file sharing, and remote control workflows. Compounding these issues, many consumer routers experience problems with UDP broadcast between 2.4GHz and 5GHz bands, which can further disrupt Alpaca discovery and device communication across mixed-band networks.
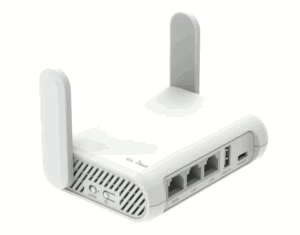
For a more robust solution, the recommended approach is to use a dedicated travel router. One excellent option is the GL.iNet portable router, which creates a stable, self-contained Wi-Fi network that functions reliably both online and offline. This setup allows all devices to share the same subnet, commonly 192.168.1.x, ensuring that UDP broadcasts for Alpaca discovery are not blocked and DHCP or static IP reservations remain consistent.
In a typical deployment, the FlatAF panel connects to the router and is controlled over the Alpaca API by an imaging computer running NINA and the FlatAF Alpaca driver. A third device, such as a laptop or tablet, can connect via Remote Desktop or similar protocol to operate the imaging software. This architecture allows seamless control, dynamic discovery, and fully automated flat frame sequences, even in completely offline environments.
Download the Design Files
You can grab the FlatAF Device Firmware and ASCOM Alpaca Driver files from the FlatAF GitHub Repository:
FlatAF is a fully 3D-printed system, and all parts are available in editable formats to support modification, remixing, and customization. This was my first major Fusion 360 project, and while I did my best to implement parametric design, the flat panel itself is only partially parameterized. The enclosure is more thoughtfully structured and should be easier to adapt. That said, depending on your goals, it may be easier to start from scratch rather than modify the existing geometry.
The design was built specifically for the Celestron EdgeHD 8 and has not been tested with any other 8-inch OTA. Dimensions and tolerances may require adjustment for other tubes. Additionally, your printer’s calibration, filament type, and material shrinkage may all affect final fitment. My process involved printing test sections, making iterative revisions, and tuning print settings as needed.
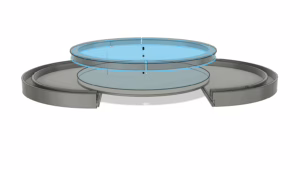
Due to the size of the panel and the build volume of my printer, I split the flat panel into two halves joined with a sliding dovetail. This joint may require some light sanding or filing for a proper fit. Once aligned, I permanently bonded the halves together using super glue. The light sub-plate portion of the design was printed in white PETG to enhance reflectivity from the bottom of the panel and also serves as a gusset to reinforce the connection between the two halves.
Included in the Download
| Images and Diagrams: | Fusion 360 Files: | Inventor Files: | PCB Files: |
| FlatAF_Assembly v2 Exploded.png FlatAF_Light_Panel.png and .pdf FlatAF_Light_Retainer.png and .pdf FlatAF_Lightwell_SubPlate.png and .pdf FlatAF_Enclosure.png and .pdf FlatAF_Lid.png and .pdf | FlatAF v9 Light Panel.f3d FlatAF_Enclosure v18.f3d FlatAF_Lid v5.f3z FlatAF light_retainer v6.f3d Lightwell_SubPlate v1.f3d | FlatAF_Assembly.iam FlatAF v9.iam light_retainer v6.ipt LightPlate Left.ipt LightPlate Right.ipt Lightwell_SubPlate v1.ipt | PCB_flataf_top.png Gerber_flataf_PCB_flataf_3_2025-04-13.zip pcb_actual.jpeg PCB_flataf_bottom.png |
Download

Click below to download the full FlatAF design archive (ZIP)
Wrapping Up
I’ve used FlatAF exclusively on my EdgeHD over the past serveral months in testing and in what has become every session use. I have used it both at home and under dark skies. FlatAF has quickly become one of those tools I can’t imagine going without. The reliability, simplicity, and flexibility it brings to my flats workflow has fundamentally changed how I approach calibration in the field.
For traveling I put together a really nice backpack bag to safely travel with FlatAF. If you’d like to support this project or decide to build one and need a case for your FlatAF flats panel, please consider picking up the official FlatAF Backpack!
I’m proud to release this to the community, not just as a utility, but as a jumping-off point for creativity and customization. Whether you want to improve it, remix it, miniaturize it, or add new features, you have full access to do so. That’s the spirit of open source: sharing tools that are practical, hackable, and built to evolve.
Clear skies, and happy calibrating.
Cheers!
Doug
Leave a Reply