Dark Sky Disaster? Here’s How to Run NINA Off-Grid
What if you finally made it to that perfect dark sky site… only to discover your imaging rig won’t connect?
Trust me — I’ve been there. You’re in the middle of nowhere at 7,500 feet at a remote camp location, the stars are dazzling, and your gear is humming… but Remote Desktop just laughs at you. You can’t connect to your control computer, NINA is out of reach, and none of your external Wi-Fi devices are showing up. Your rig is ready — but your network isn’t.
In this guide, I’ll show you how to build a bulletproof off-grid network for astrophotography that just works. Whether you’re in your backyard, at a club star party, or deep in the desert, this guide will help you create a reliable connection to your rig — no matter where you image. Let’s dive in.
Why the Windows Hotspot Fails You

At first glance, using the built-in Windows Hotspot sounds great: you just flip a switch and everything connects — right?
Unfortunately, in practice, it’s wildly unreliable for astrophotography. Here’s why:
Windows requires an active Wi-Fi connection at startup to trigger the hotspot
If there’s no existing internet connection, the system often skips hotspot initialization entirely.
Hotspot won’t start until after login
This means your control MiniPC has to fully boot and wait for a user to log in — not ideal when you’re trying to run headless in the field.
- Workarounds break constantly
Yes, you can create scheduled tasks or PowerShell scripts to force-enable the hotspot at boot… but they’re brittle. Windows updates or driver changes often reset permissions, break startup timing, or simply ignore the config. - LAN support is flaky at best
Even when the hotspot is running, device discovery is hit-or-miss. Static IPs don’t always hold, and services like NINA, ASCOM, or RDC regularly fail to detect your devices over the ad-hoc network.
In short: Windows wasn’t designed to be your mobile network router — and it shows. If you’ve ever spent 45 minutes fiddling with your phone flashlight, rebooting your MiniPC, and cursing at a missing Wi-Fi network… you already know this pain.
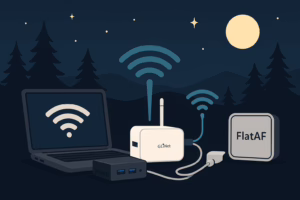
Meet the GL.iNet Router (and Why It’s a Game Changer)
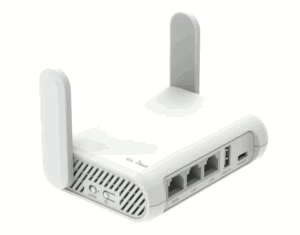
Enter the GL.iNet GL-SFT1200 — a compact travel router that quietly solves everything Windows Hotspot breaks. Here’s why I’ve adopted it as the core of my mobile astro rig:
✅ Reliable DHCP and IP reservation
Through your configuration, devices always get the same IPs — no more chasing dropped connections or reconfiguring ASCOM.
✅ Dual-band Wi-Fi (2.4GHz + 5GHz)
Both bands operate on the same subnet, so devices on 2.4GHz and 5GHz can communicate seamlessly. My MacBook and RDC fly on 5GHz with zero lag, while lower-bandwidth gear connects reliably on 2.4GHz — no IP isolation, no cross-band headaches.
✅ USB-C powered
Runs straight off my Wanderer Astro PowerBox. No weird adapters. No hassles. Just the same standard connectors that I use for everything else and keep extras in my rig box.
✅ Mode switching is seamless
It handles LAN, Extender, and Router modes like a champ — and you can pre-configure them all with the same SSID and password. This allows you to switch modes and continue seamless connections from your networked devices to your astro rig.
At just a few ounces and about the size of a deck of cards, this thing punches way above its weight. It has surprising range for its size, is dead simple to configure, and plays nice with every device in my ecosystem — from MiniPC to MacBook to other accessory devices.
Oh — and bonus points? It actually looks great on the rig. Sleek, matte white, no blinky neon gamer nonsense. Just clean, compact, and functional. One note: it does have a small LED indicator, which I recommend blacking out with a bit of gaffer tape to preserve your night vision.
Network Modes That Just Work
The GL.iNet router supports three key modes — and each one fits a specific use case: LAN mode for backyard sessions with Ethernet and full internet access via your home network, Extender mode for wireless use on your home network (with internet access), or at star parties and shared observatories where you can tap into existing Wi-Fi while maintaining local device control, and Router mode for fully off-grid imaging where no external network is available — but all your gear stays connected locally.
This system allows you to switch between the following modes as needed — and the key to keeping it seamless is consistency.
Use the same SSID and password across all modes — LAN (your main network via Ethernet), Extender (your main network via Wi-Fi), and Router (self-contained off-grid) — so your devices reconnect automatically no matter where or how you’re imaging.
This setup means no re-pairing, no manually selecting networks, and no adjusting NINA, RDC, or ASCOM configs between locations.
Once you’ve dialed in your network settings and static IPs, your rig just connects — whether you’re at home, on a shared network, or off-grid in the middle of nowhere.
🟢 LAN Mode (On-Grid Ethernet)
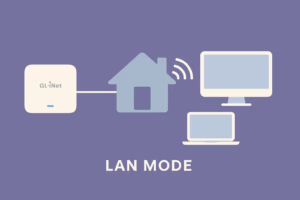
Plug into your home network via Ethernet. In this mode, the GL router defers to your main network’s DHCP server, honoring any existing IP reservations or configurations. It acts as a simple bridge, keeping your gear discoverable while providing full internet access. Perfect for backyard sessions or any location with a wired uplink.
🔵 Extender Mode (On-Grid Wi-Fi)
No Ethernet nearby? The GL router wirelessly joins your main Wi-Fi network and extends it to your astro gear. Just like LAN mode, it passes through your existing network’s DHCP and IP reservations, so your devices stay connected with internet access and stable local control — no compromise.
🟠 Router Mode (Off-Grid / Field Use)
Out in the wilderness? This is where the magic happens. The GL router creates its own self-contained Wi-Fi network, giving your MacBook, Windows Laptop, MiniPC, and other network devices a stable, fully local connection — no internet required. In this mode, the GL router acts as the primary DHCP server, so it’s critical to configure the subnet to match your home network (e.g., 192.168.1.x) and assign static IPs to your gear that match your home network reservations. This ensures seamless handoff between home and field — all devices connect instantly, with no software reconfiguration needed.
Switch modes as needed — and keep your SSID and password the same across all of them!
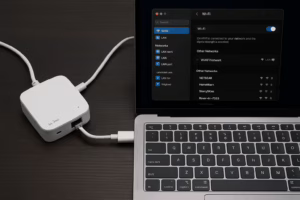
GL Router Configuration: Seamless Setup Across All Modes
To connect with Remote Desktop and access NINA without headaches, your router needs to behave like it’s always at home — even when you’re 100 miles from your actual network. This system lets you switch between modes as needed, and the key to keeping everything seamless is consistency.
Use the same SSID and password across all modes — LAN (your main network via Ethernet), Extender (your main network via Wi-Fi), and Router (self-contained off-grid) — so your devices reconnect automatically, no matter where or how you’re imaging.
Here’s how I configured my GL.iNet router to mirror my home network, allowing all of my software and devices to work without the need for any changes.
1. Match the Subnet to Your Home Network
By default, GL.iNet routers use the 192.168.8.x subnet, but I changed this to match my home network, which runs on the standard 192.168.1.x range.
- Navigate to Network > LAN
- Change the IP address of the GL.iNet router to
192.168.1.x, wherexis any unused IP on your main network. I use192.168.1.180, and have that address reserved on my home router. - Save and reboot
This sets the GL.iNet router’s internal subnet to 192.168.1.x, allowing all your devices to keep the same IPs across all modes — no need to reconfigure any of your network devices, RDC, or computers when switching between home and field.
It also ensures proper communication between devices connected on different bands (2.4GHz and 5GHz), which can break down if they’re placed on isolated subnets.
⚠️ After reboot, you’ll access the router’s admin interface at the new IP address — for example,
http://192.168.1.180in my case.
2. Set a Universal SSID and Password
Next, configure your Wi-Fi settings under Wireless in the GL.iNet interface.
Use the same SSID and password as your main network.
When in Router mode, the GL.iNet router will broadcast this network on its own.
When in LAN or Extender mode, the GL.iNet Wi-Fi will be disabled, avoiding any conflict with your home network — but devices will reconnect seamlessly thanks to the identical credentials.
- SSID: (same as your home network name)
- Password: (same as your home network password)
✅ Use the same SSID/password across LAN, Extender, and Router modes
➡️ Devices auto-reconnect in any mode — no re-pairing required
3. Reserve IPs via DHCP
Under Clients > Client List, set static IPs that match your home network configuration. This ensures your devices always get the same IP addresses, no matter the mode.
| Device | Connection | Reserved IP |
|---|---|---|
| MiniPC | Wired | 192.168.1.x |
| [Your Device] | Wi-Fi (2.4GHz) | 192.168.1.y |
This step is critical for making sure NINA, RDC, and other software never lose track of your gear — even after reboots or when switching between network modes.
🧠 Optional: Label your devices for clarity.
Powering Your Off-Grid Setup
Here’s how I keep everything running reliably through the night — even in remote locations without any type of power infrastructure available.
🔋 Primary Power Chain: Jackery → Allpowers
My system runs in a chained power configuration using two portable power stations, providing ample capacity for overnight sessions — with just enough left over for flats and shutdown procedures in the morning.
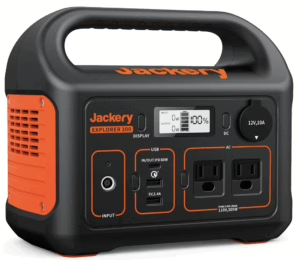
- Jackery Explorer 300
This is my first-line power source. It’s compact and delivers 293Wh of lithium power with multiple DC and USB outputs. It handles the early part of the night with ease, powering my router, MiniPC, and the core imaging rig until it’s depleted.
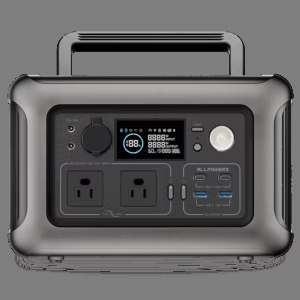
- Allpowers R600 (Get 10% Discount with Code: ASTROAF)
Once the Jackery runs low, the R600 seamlessly takes over. With 600Wh of capacity, dual AC outlets, multiple USB ports, and a mobile app for real-time monitoring (even from the sleeping bag), it’s built for long-duration, fully remote imaging sessions.
I route power from the Allpowers R600 into my Wanderer Astro PowerBox Plus V3, which manages and regulates power and data distribution to the entire rig — including the mount, MiniPC, dew heater, main and guide cameras, focuser, and filter wheel.
🧪 Pro Tip:
I daisy-chain the units using a DC power cable: the Jackery connects to the Allpowers via its 12V cigarette lighter output, and then the Allpowers supplies power to the rig through a second 12V DC line into the PowerBox. This setup ensures the system draws from the Jackery first, then automatically switches to the Allpowers without interruption.
⚡ Bonus Tip:
Avoid using the AC outlets if you can — DC power is far more efficient for astro gear. Keeping the entire chain on DC reduces conversion losses, increases runtime, and simplifies cable routing.
☀️ Recharging with Solar or Car
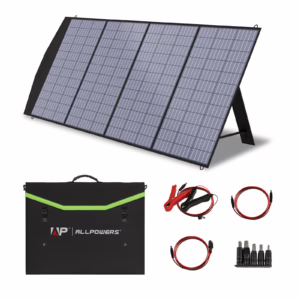
During the day — starting promptly at sunrise — I recharge both stations using the Allpowers SP033 200W Portable Solar Panel (Get 10% Discount with Code: ASTROAF). It’s a rugged, foldable polycrystalline panel with adjustable kickstands, MC4 adapters, and a built-in pocket for storing cables and connectors. It folds flat and straps easily to my gear crate for transport.
As the sun moves across the sky, I manually tend the panel throughout the day, repositioning it to maintain a direct angle toward the sun. This significantly improves charge efficiency, especially during limited solar windows.
With good sunlight, this setup fully recharges both the Allpowers R600 and Jackery Explorer 300 in a single day.
The SP033 panel performs exceptionally well in the field, and its portability makes it a great match for mobile astrophotography — setup is quick, breakdown is fast, and it stores easily alongside my imaging gear.
🌥️ Cloudy-Day Fallback: Vehicle Charging
If the weather doesn’t cooperate, I use a 12V connection to my car’s battery or cigarette port to recharge both units. This ensures I’m fully charged and ready for the next night — even without sun.
I usually pair this with an excursion or break during the day. On a recent trip to New Mexico, I was just 25 minutes from the Very Large Array (VLA). We took an afternoon tour, and I charged both power stations in the truck while we were out exploring.
⚡ Real-World Power Usage
My complete rig — including the MiniPC, GL.iNet router, camera cooling, and accessories — is powered through my WandererBox Plus, and draws an average of 38 watt-hours per hour during imaging. It tends to peak at about 48 watt-hours and has an approximate low shelf at 32 watt-hours.
In actual use:
- The Jackery Explorer 300 and Allpowers R600, combined, provide about 9–10 hours of total runtime
- This estimate accounts for built-in discharge protection — the Allpowers unit does not fully deplete under normal conditions
With solar recharging during the day, this setup comfortably supports multi-night off-grid sessions, even with extended imaging runs or occasional power spikes.
🧠 Power Monitoring Tip:
I confirmed this draw at home using the HBN Watt Meter Plug with Backlight (Affiliate Link) — a simple plug-in tool that tracks actual watt-hours consumed over time. It’s an easy way to validate your power needs before heading into the field.
🔋 Personal & Accessory Power Backup: INIU 65W Power Bank
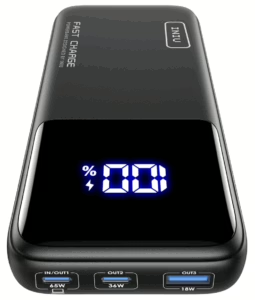
For everything else — my iPhone, MacBook Air, and other small accessories — I rely on the INIU 20,000mAh 65W Power Bank. It’s compact, airline-safe, and powerful enough to top off a laptop or keep critical accessories running when I need them most.
The INIU features:
- 65W USB-C PD output, capable of powering most modern laptops
- Dual USB-C ports + one USB-A port, allowing simultaneous charging for multiple devices
- From a full charge, it gives my MacBook Air ~60% charge overnight
- Recharges easily via car, or directly from the Allpowers R600 during solar charging hours
It’s the perfect emergency backup for flat panel power, MacBook runtime, or just keeping my phone alive through a long night under the stars. I also bring along a generic brick USB charger that will charge my iPhone 3x before needing a recharge, so I usually rely on that for overnight phone charging.
Seamless Access, Anywhere
The magic of this setup is that everything just talks — no matter where you are. With three distinct modes to match any network condition, it’s a bulletproof system that has kept me connected across every scenario I’ve faced in the field. Once you’ve completed the setup and configuration steps above, you’re done — no reconfiguring, no re-pairing. Whether you’re imaging from home, a club star party, or 100 miles off-grid, your devices will connect exactly as if they were on your home network.
It’s that simple:
- 🖥️ MiniPC stays wired to the GL.iNet router
- 📶 Accessories connect via 2.4GHz Wi-Fi
- 💻 MacBook (or Windows laptop) connects via 5GHz or directly to your main network
Result? You open Remote Desktop, NINA auto-detects your gear, everything is online — and you’re ready to image the night skies.
Even in the field. Even off-grid.
Final Tips and Gotchas
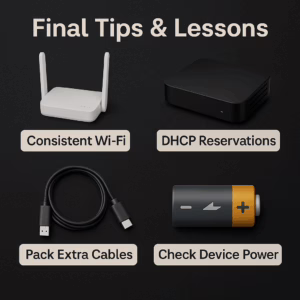
Here’s what I’ve learned after several field trips, long cold nights, and gear troubleshooting under the stars:
- Use the same SSID and password across all modes
This is the secret sauce — it ensures devices reconnect automatically, no matter whether you’re at home, in Extender mode at a star party, or fully off-grid. - Set DHCP reservations for your key devices
Reserve IPs for devices like your MiniPC and critical networked accessories to avoid conflicts or reconfiguration headaches. This ensures stable connections for NINA, RDC, and anything else that relies on predictable network paths. - Pack extra cables — especially USB-A → USB-C
Cables fail more often than you’d think. Always bring backups for power delivery to your GL router, accessories, and battery packs. A few grams of prevention = hours of imaging saved.
If a device disappears from the network, check its power first
In the cold, things like Wi-Fi adapters can quietly shut down if underpowered. A quick battery check (or swap to external power) can bring them right back online.- Optional: Label your reserved IPs
If you use static IPs in software like NINA or ASCOM, consider labeling devices or keeping a printed cheat sheet in your case. This can save time and frustration when reconnecting or debugging in the dark.
Once you dial this in, you won’t want to connect to your rig for imaging any other way.
Tools I Trust (Affiliate Links)
- 🔗 GL.iNet Router
- 🔗 Jackery Power Station
- 🔗 Allpowers R600 Power Generator (Get 10% Discount with Code: ASTROAF)
- 🔗 Solar Panel AP-SP-033 (Get 10% Discount with Code: ASTROAF)
- 🔗 INIU 65W Power Bank
- 🔗 MeLe Quieter 3C Mini PC

Leave a Reply