EdgeHD 8, Celestron OAG, Astroasis EFW, Player One Artemis-M Pro
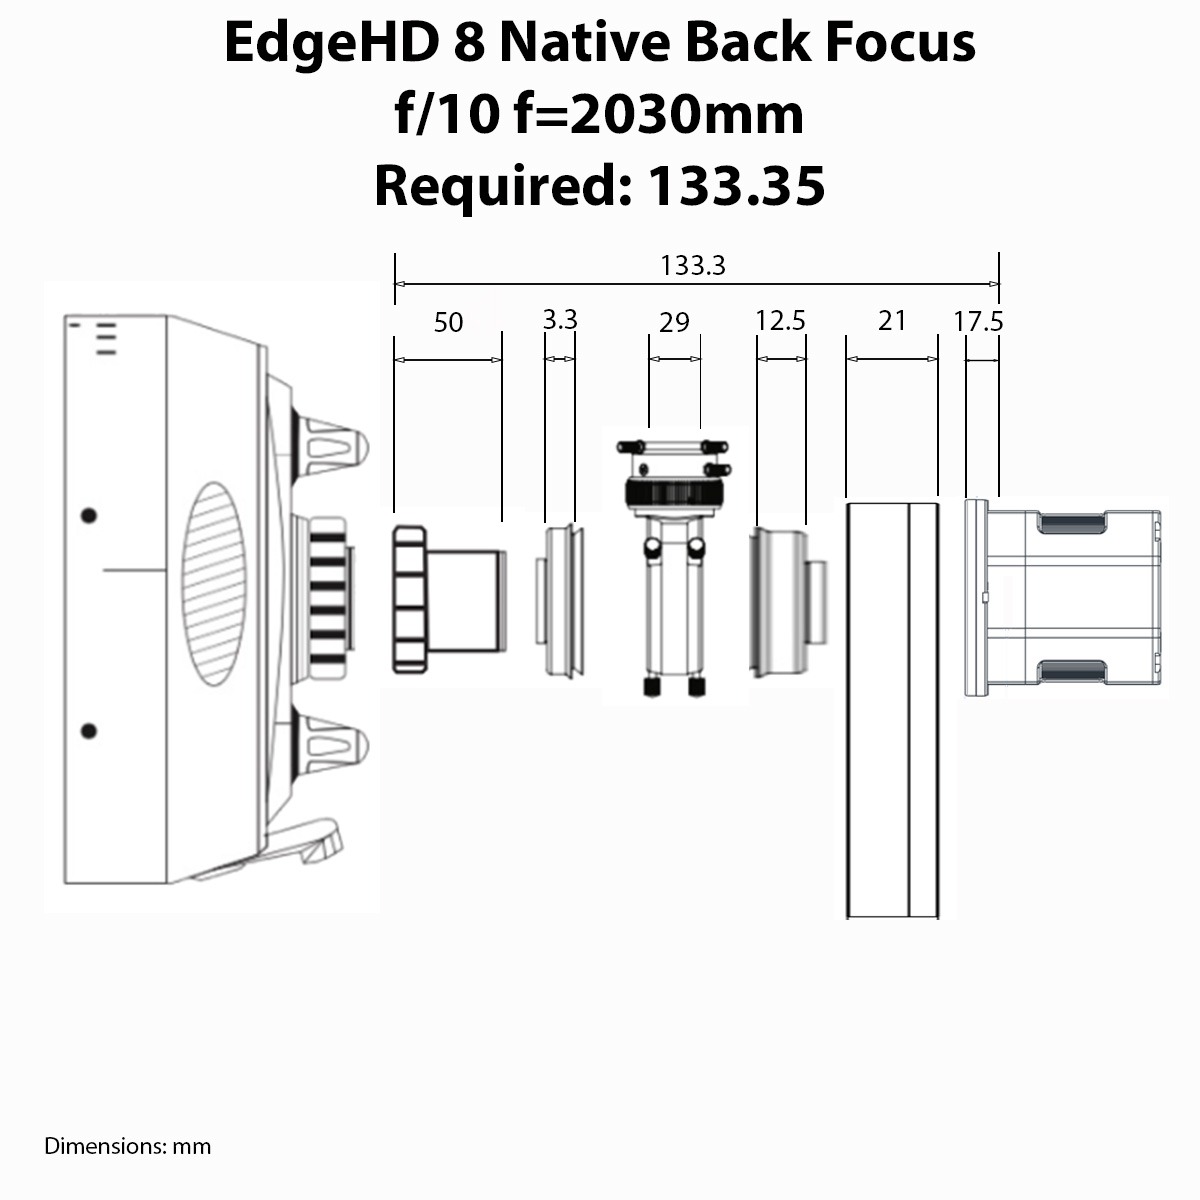
In my video and in this article, I am sharing my steps to calculate and make back focus simple for setting up an image train. In the case of my gear, I am setting up the image train on my Celestron EdgeHD 8 with a Celestron OAG, an Astroasis Oasis Electronic Filter Wheel, and a Player One Artemis-M Pro astrophotography camera. The beauty of this setup is two-fold in that I can swap out cameras or change from native focal length to the Celestron .7x reducer without having to modify anything from the OAG back to the camera. Below, I have provide a detailed diagram of the components I’m using and their associated dimensions in the image train to establish the required back focus distance. I will discuss the process of setting up the Celestron T-Adapter and making up connections to the OAG, connect the OAG to the @astroasis2020 Electronic Filter Wheel, and finally attach the @playeroneastronomy2772 Artemis-M Pro to complete the chain.
The Back Focus Diagram

In this setup, walking through left to right, we start with the Celestron T-Adapter (with the actual T-Threads removed from the tube) connected to the EdgeHD optical tube. This gives a starting back focus of 50mm and allows us to connect to the Celestron OAG adapter which adds another 3.3mm. The Celestron spec provides that this is actually 4.5mm but my measurement with digital caliper from the points indicated on drawing differed. The OAG adapter connects to the OAG with the set screws into the channel of the adapter. The OAG measured out at 29 mm as per spec. On the back of the OAG is the camera adapter, taking up an additional 12,5mm which connects to my Astroasis Oasis Electronic Filter Wheel, adding another 21mm. Finally, the Player One Artemis-M Pro sensor is set back 17.5mm from the front of the tilt plate. The sum total is 133mm, being well within spec of the Celestron required back focus of 133.35mm.

Benefits Of This Setup
There’s really only one major benefit of this setup and that is that nothing from the front of the OAG needs to change in order to switch from native focal length to adding the .7x reducer. I simply need to disconnect the 3.3mm OAG adapter on the front of the OAG and remove the T-Adapter tube. Then, replace with the .7x reducer and and add the larger Celestron OAG SCT adapter. The remaining image train remains the same to achieve the 105.3mm back focus required with the reducer.
Other benefits are found from the OAG itself, which provides for rotation before and after the OAG, allowing to rotate the entire train from OAG back to camera, or one can rotate just the filter wheel and camera from behind the OAG.
Thanks so much for stopping by and I hope my video and this article help you in your own setup. Please feel free to comment if you have any questions or feedback. Do please share if you know someone who needs information that might help them with their own setup.
Cheers!
Doug


Leave a Reply